Hiya folks!
Today I want to share something very special with you!
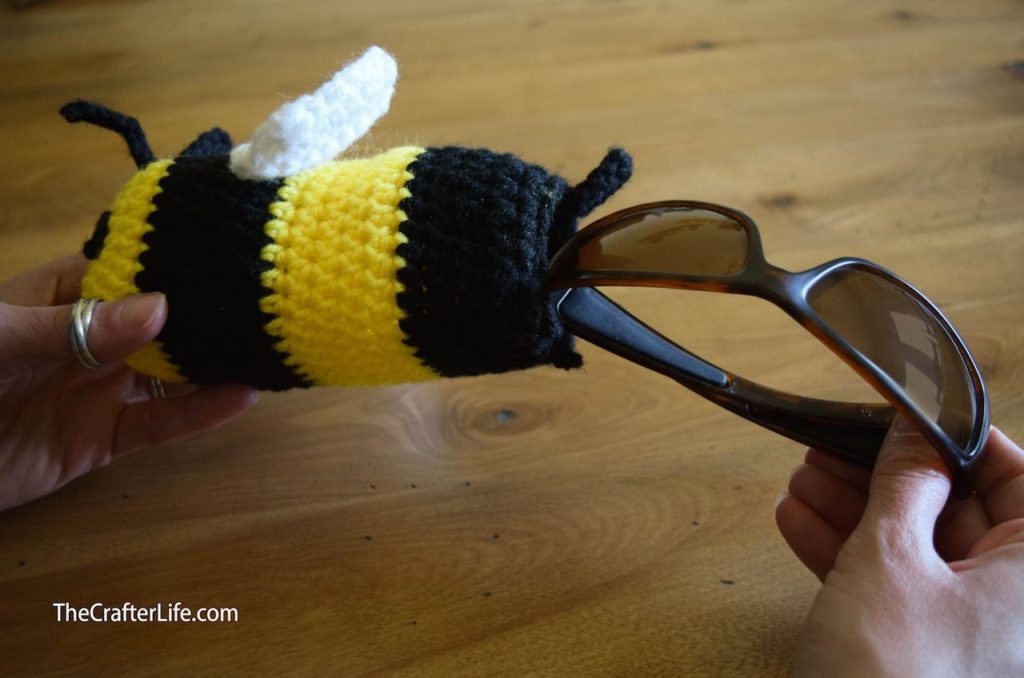
It’s a crochet sunglass case – a Bee Drawstring Sunglass Bag pattern to BEE exact. 😉

And I so wish that I could take credit for this gem, but I always try to be honest, so, alas
This fabulous pattern is the artistic ingenuity of Chelsea Roberts of The Crafter Life, where you can find some simply amazing crochet creations, as well as lots of other crafty inspiration.
To learn more about Chelsea and The Crafter Life, please check out her full bio – you won’t be disappointed!
So, without any further ado… Let’s let Chelsea say hello and tell you a bit more about her and her pattern.
Hi, Everyone!
I am excited to be here on Itchin’ for some Stitchin’ with RaeLynn!
I am Chelsea from TheCrafterLife.com, which is my craft blog.
On my blog, you will find some ideas for children’s crafts, DIY projects, and crochet patterns.
I love to crochet and I am thrilled to share my most recent spring-inspired pattern with you…A Bee Drawstring Sunglass Bag!

It’s time to pull out your sunglasses because spring is in the air…and so are the bees!
You will be sure to create a “buzz” this spring with my Bee Drawstring Sunglass Bag!
This may “bee” cute, but it will protect your glasses in style.
The drawstring on the back makes it easy to attach it to a bag or a hook so you don’t have to carry your glasses or lose them in your purse.
Bee Drawstring Sunglass Bag Pattern
Pattern by Chelsea from TheCrafterLife.com
The pattern and photos of this item are the property of TheCrafterLife. This pattern and design are subject to
You may make items to sell (i.e. on Etsy) from my patterns but I ask that you link back to provide credit for the pattern. You are welcome to share my patterns on social media as long as you link back
Prefer a PDF?
[list style=”style6″] [li]This pattern is also available for purchase as a large print, ad-free, printable PDF pattern. Get it HERE.[/li]Love Pinterest? I do!
[li]PIN this pattern to your Pinterest boards for later HERE. You can also follow all my boards![/li]INSTRUCTIONS
This sunglass bag pattern is written to hold most adult-size sunglasses. Smaller sunglasses will also fit inside the bag.
FINISHED MEASUREMENTS
The bee bag is approximately 61⁄2 inches long and 9 inches around (circumference). It has a diameter of almost 3 inches.
MATERIALS
– Size H/8/5.00mm crochet hook or size needed to obtain gauge
– Worsted weight (4) yarn in Yellow (I used Red Heart Super Saver in Bright Yellow.)
– Worsted weight (4) yarn in Black (I used Red Heart Super Saver in Black.)– Worsted weight (4) yarn in White (I used Red Heart Super Saver in White.)– Tapestry needle for weaving in ends and sewing parts onto
– Scissors
– Measuring tape
Optional Items:
– Stitch markers (if needed for marking/counting stitches or rounds)
– Straight pins (if needed for positioning the body parts in place before sewing)
ABBREVIATIONS
– ch = chain
– chs = chains
– dc = double crochet
– hdc = half double crochet
– hdc2tog = half double crochet 2 together (half double crochet decrease) – sc = single crochet
– slst = slip stitch
– st = stitch
– sts = stitches
SPECIAL STITCHES
– hdc2tog (hdc decrease): Yarn over, insert your hook under the first stitch, yarn over, and pull up a loop (you should now have 3 loops on your hook). Then, yarn over and insert your hook under the next stitch, yarn over, and pull up a loop (you should now have 5 loops on your hook). With five loops now on your hook, yarn over and pull through all five loops.
GAUGE
4 hdc = 1 inch; 3 rounds = 1 inch
PATTERN NOTES
- The striped body of the bee bag is made first with joined rounds of half double crochet stitches. Each round is completed with a slip stitch to the first stitch of the round (do not count the slip stitch used to join each round as a stitch).
- The first stitch of each round is made in the very first stitch of the previous round (the same stitch in which the join/slip stitch and ch-1
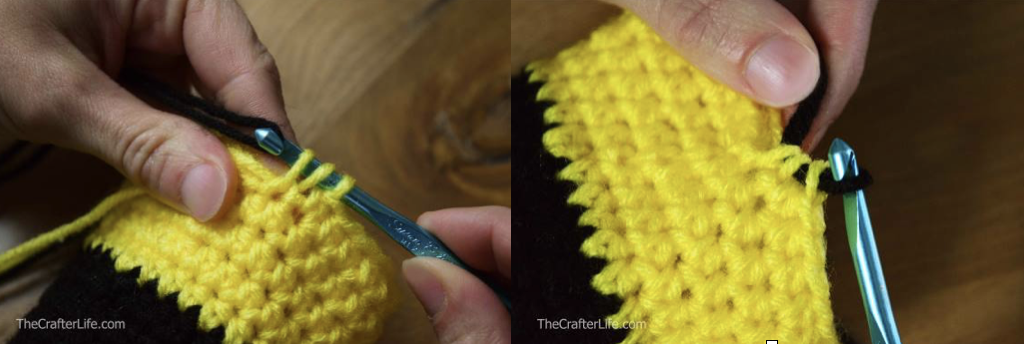
was made). - The yarn is cut after each color change. When you cut the yarn after changing color, leave a long enough tail to weave in the ends as you work.
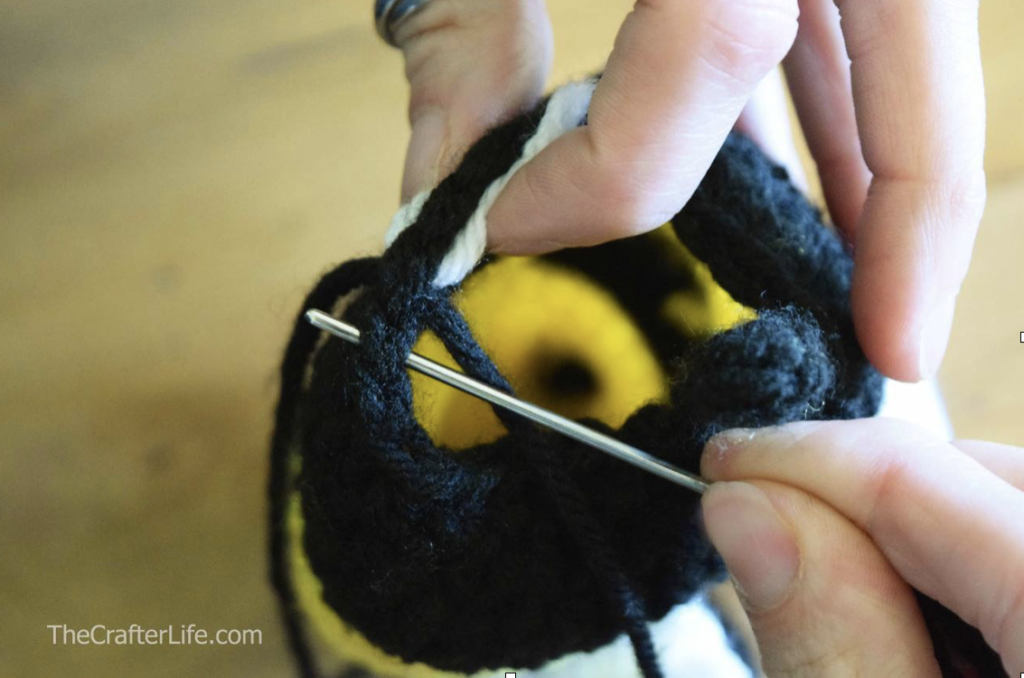
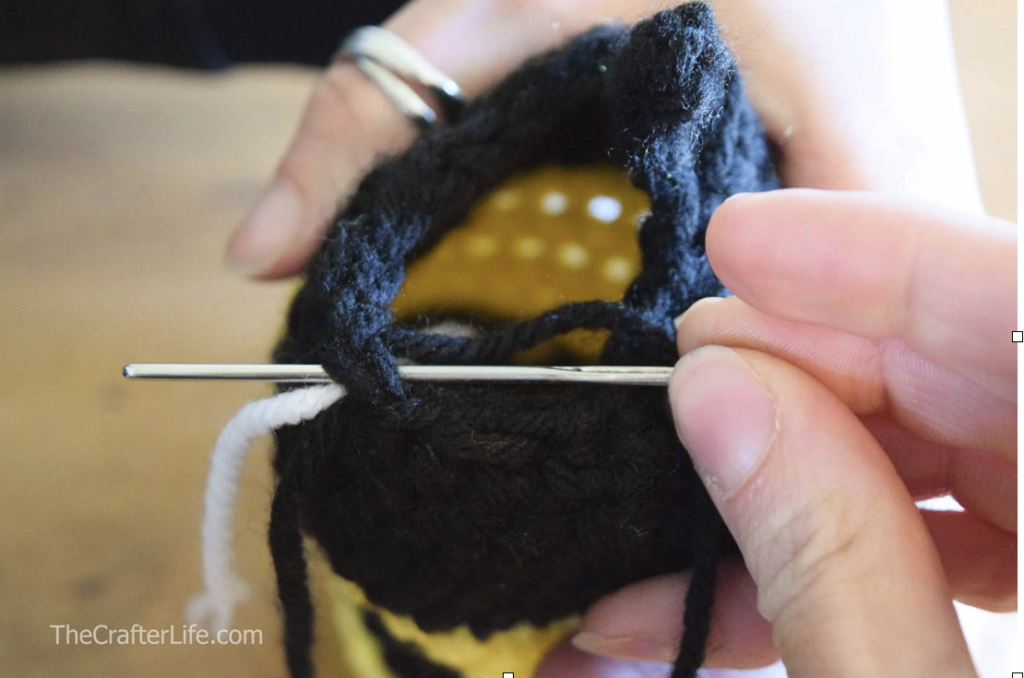
- When changing color, join the new color while completing the last
hdc (halfdouble crochet) of the previous color (by pulling through the new color when you have three loops on the hook in the previous color to complete the finalhdc ). **See pictures below**
DIRECTIONS
Striped Body of Bee
*The bee sunglass bag is made starting with the yellow closed end (the head of the bee).
*Use your yellow worsted weight yarn to begin the first round.
*Make sure to pull the magic ring closed and weave in
*Each colored stripe of the body is 5 rounds (color changes are made at the end of every 5 rounds).
Round 1: Make a magic ring, ch 1, work 10 hdc in magic ring, pull ring closed, join to first hdc with a slst. (10 hdc)
Round 2: Ch 1, 2 hdc in each st around, join to first hdc with a slst. (20 hdc)
Round 3: Ch 1, hdc in first st, 2 hdc in next st, repeat [hdc in next st, 2 hdc in next st] around, join to first hdc with a slst. (30 hdc)
Round 4: Ch 1,
Round 5: Ch 1,
Rounds 6–9: Ch 1,
Round 10: Ch 1, hdc in next 29 sts, begin hdc in 30th st, joining/pulling through yellow yarn to complete the hdc, join to first hdc with a slst. (30 hdc)
Rounds 11–14: Ch 1, hdc in each st around, join to first hdc with a slst. (30 hdc)
Round 15: Ch 1,
Rounds 16–18: Ch 1,
Round 19: Ch 1, hdc in first st, hdc2tog, repeat [hdc in next st, hdc2tog] around, join to first hdc with a slst. (10 hdc, 10 hdc2tog; 20 total sts)
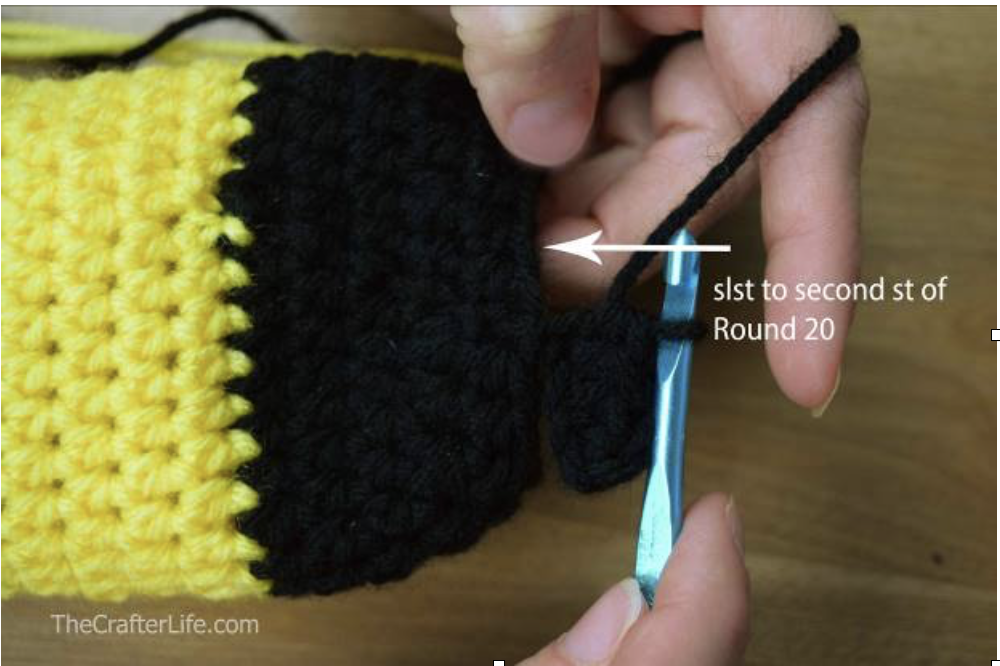
Round 20: Ch 1, hdc in each st around, join to first hdc with a slst, do not fasten off, leave yarn on hook. (20 hdc)
HINT: To help you when attaching the drawstring later, you may want to mark the 11th stitch of Round 20 with a piece of yarn/stitch marker since you will need to locate that stitch when starting the drawstring.
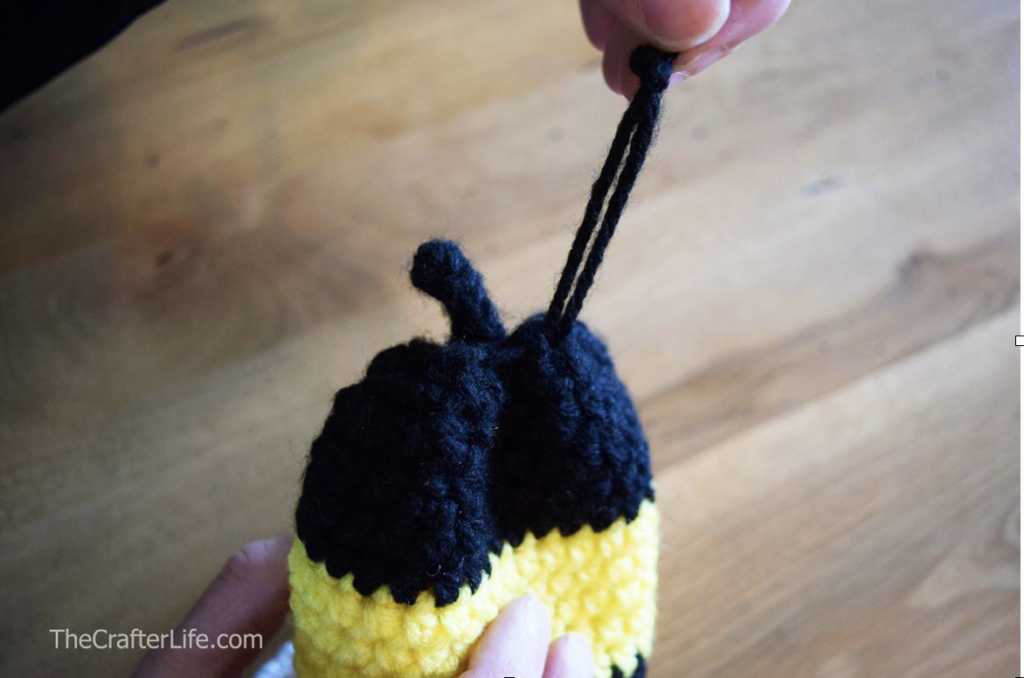
***You should now have the main bee body with 4 alternating stripes. You should have left your yarn on the hook after completing the slip stitch at the end of Round 20 so you can begin making the stinger. Follow the directions below for the stinger.
Stinger
With your yarn still on your hook after completing Round 20 of the bee body, follow the pattern below for the stinger.
Ch 5,
Once you have your stinger complete, follow the directions below to make the rest of the bee body parts.
Eyes (Make 2)
The eyes are made in one round of 4 single crochet stitches. Use your black yarn to make the eyes.
Round 1: Make a magic ring, ch 1, work 4 sc in magic ring, pull ring closed, join to first sc with a slst, leave a long tail for sewing the eye on the head, but secure the beginning end you used to pull the ring closed. (4 sc)
Wings (Make 2)
The wings are made in rows. Use your white yarn to make the wings. Leave a long tail at the beginning hang loose from the slip knot so you can use that to sew the wing onto the body.
Row 1: Ch 5, hdc in 2nd ch from hook and in next 3 chs across. (4 hdc)
Row 2: Ch 1, turn, 2 hdc in first st, hdc in next 2 sts, 2 hdc in last st. (6 hdc)
Row 3: Ch 1, turn, hdc in each st across. (6 hdc)
Row 4: Ch 1, turn, 2 hdc in first st, hdc in next 4 sts, 2 hdc in last st. (8 hdc)
Rows 5–6: Ch 1, turn, hdc in each st across. (8 hdc)
Row 7: Ch 1, turn, hdc2tog,
Antenna (Make 2)
The antennae are made in one row of slip stitches. Use your black yarn to make the antennae.
Row 1: Ch 8, slst in 2nd ch from hook and in next 6 chs across, fasten off, leave a long tail for sewing the antenna onto the top of the head.
**You should now have all the bee’s body parts made. Follow the directions below for attaching them to the body.
ASSEMBLY
Use your tapestry needle to attach the body parts to the bee.
- Use your tapestry needle and the long tail you left on each eye to sew the eyes to the front of the face between Rounds 2 and 3 of the bee body. Make sure the stinger is centered between the eyes. You may wish to use straight pins to help you position/hold the eyes in place before you attach them. Secure/knot your yarn on the underside of the face after you sew around the eye.
- Position the wings where you would like them (I placed them centered with the eyes and stinger, with the short edge/starting chain of each wing between Rounds 8 and 9 of the bee body). Use your tapestry needle and long tail you left at the slip knot of each wing to sew them in place. I sewed the wings down along their short edge/starting chain and down two rows/two stitches on the outside of the wing so they are free enough to flip
up, if desired. Make sure to secure your yarn well once you are satisfied with the positioning of the wings.
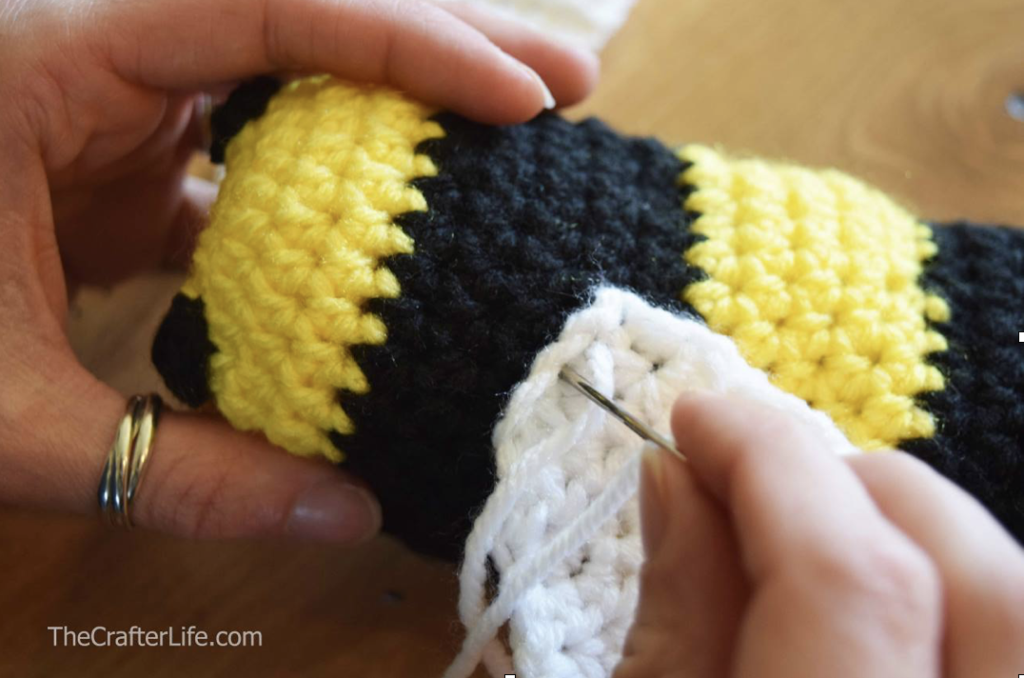
3. Use your tapestry needle and long tail you left on each antenna to attach them to the head so that they are centered between the eyes on Round 4 of the bee body. Secure your yarn well when you are finished.
Attaching the Drawstring
1. Cut a strand of black yarn that is 25 inches long.
2. Thread the strand of black yarn through your tapestry needle and insert the needle through the top two loops of the 11th stitch of Round 20 of the bee body (inserting the needle from the outside of the bag to the inside). You may have marked this stitch earlier. Pull the yarn through until you have a tail of about 2 or 3 inches left on the outside of the bag.
3. Bring your needle/pull your yarn through the top two loops of the 10th stitch of Round 20 (from the inside to the outside of the bag).
4. Bring your needle/pull your yarn through the top two loops of the 8th stitch of Round 20 (from the outside to the inside of the bag).
5. You will now continue weaving your needle in and out through every other stitch of Round 20 (6th, 4th, 2nd, 20th, 18th, 16th, 14th, and 12th stitch). Once you take your needle through the 12th stitch of Round 20, bring it back out through the 11thstitch, where you already have your beginning tail. The two ends of the yarn strand should now be coming out of the top two loops of the 11th stitch of Round 20 (both hanging on the outside of the bag).
6. Make sure the bee bag is open and not pulled closed. Hold both loose ends of the drawstring together, loop them around your finger and pull the tails through the loop to create a knot. Make the knot as close to the open edge of the bag as possible. You want to make at least a double knot, so repeat the process of looping the two strands around your finger and pulling through the ends to make the knot larger. Once you have a decent/secure knot, cut the two tails pretty close to the knot.
7. Test the drawstring by pulling it to close the bag. The drawstring should now be a loop that you can use for holding or attaching to something.
***Once you are finished with the drawstring, you are now ready to use your sunglass bag. Place your favorite pair of sunglasses inside the bag for a totally unique way of protecting them.
Didn’t I tell you that Chelsea created the most amazing crochet creations?
I don’t know what I love most about this pattern, the cute little stinger or the lovely wings — the whole project is simply AWESOME!
Plus, it’s super useful. Whip up this sweet little bee sunglasses bag and protect your favorite glasses in style!
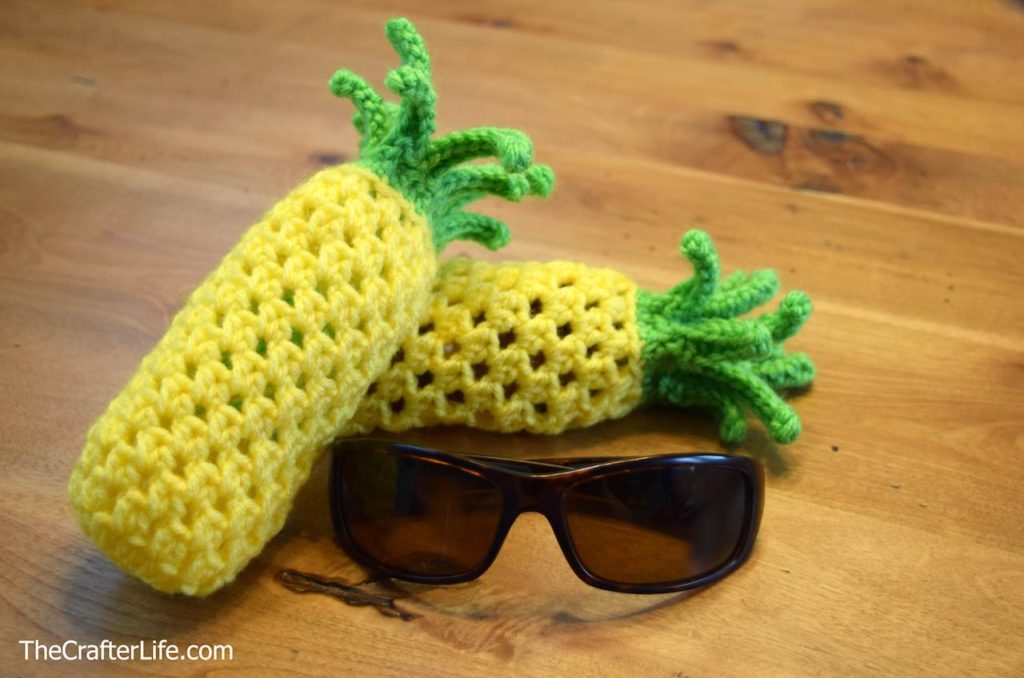
And if you liked this pattern, then I have a treat for you!
Because Chelsea also has a summer Pineapple Drawstring Sunglass Bag that’s perfect for those of you who love that Tropical flare.
Check it out!
Please Share!
Until next time… Happy Crocheting!


Looking for fun crochet community filled with lots of crafty inspiration?
[list style=”style6″] [li]Join Our New Facebook Group – Itchin’ for some Stitchin’ Beginner Crochet Community[/li] [/list](Experienced crocheters also welcome!)
Cat
Wednesday 26th of June 2019
Such a cool idea! I absolutely love the bee design. This is goin on my list of things to make...
Itchin4Stitchin
Friday 28th of June 2019
Yay! I think it’s super clever too!Th
Thanks so much for stopping by!
Sincerely,
RaeLynn
Connie Majoros
Thursday 30th of May 2019
Hi, Just purchased the drawstring bee sunglasses pattern on my credit card. I went to my email and there is no receipt so no link to download the pattern. I’m lost. Any idea where to go next? Thanks, Connie
Itchin4Stitchin
Thursday 30th of May 2019
Hi Connie,
The Bee Drawstring Bag pattern was by a guest designer, Chelsea Roberts of from The Crafter Life.
I assume you purchased it via her Etsy shop? There should be a way to message Chelsea directly through Etsy.
I will also be happy to send Chelsea a personal email on your behalf.
Please send me an email at [email protected] so I can email you with her response.
Sincerely,
RaeLynn