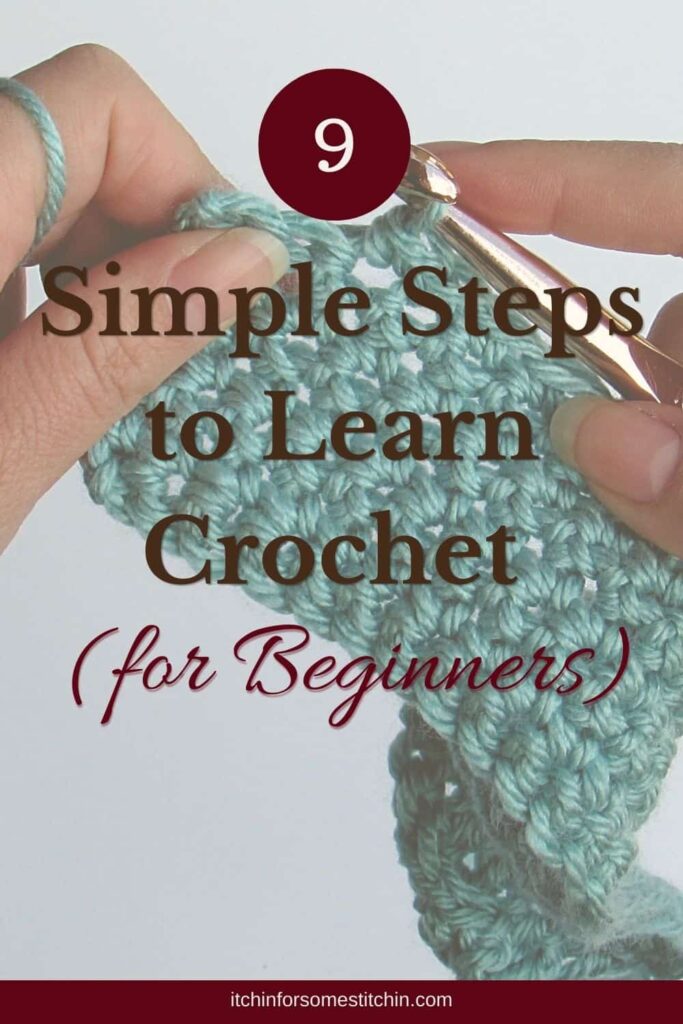

Learning how to crochet for beginners can feel a little overwhelming at first. There are hooks, yarn, stitches, patterns, and a whole new vocabulary that can make it seem more complicated than it really is.
The good news is that crochet is actually built from a handful of simple steps. Once you understand the basics, everything else starts to fall into place.
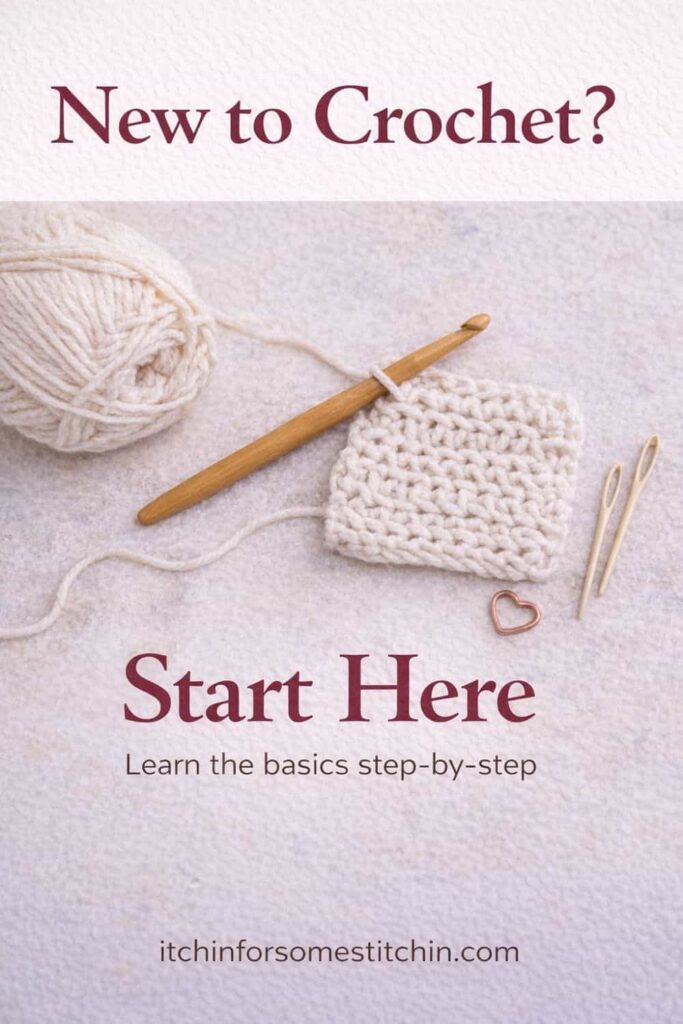
This beginner crochet guide will walk you through the essential steps you need to know to get started. Whether you have never picked up a crochet hook before or you are trying to make sense of the basics, these foundational skills will help you build confidence and start creating your first crochet projects.
Crochet may look intricate, but at its core it is simply the process of pulling loops of yarn through other loops using a crochet hook. By repeating a few basic stitches and techniques, you can create everything from dishcloths and scarves to blankets, sweaters, and decorative projects.
In this guide, you will learn the fundamental crochet steps every beginner should understand before moving on to patterns and projects. These steps form the foundation of nearly every crochet design.
In this tutorial, we will cover:
- what crochet is and how it works
- the basic crochet stitches beginners learn first
- how to start a project with a slip knot and foundation chain
- how to work rows of stitches and turn your work
- how to finish your project properly
If you are brand new to crochet, take your time with each step and practice as you go. With a little patience and a bit of yarn, you will be surprised how quickly the basics begin to click.
Table of Contents
What Is Crochet?
Crochet is a craft that uses a single hooked tool called a crochet hook to pull loops of yarn through other loops, creating fabric one stitch at a time.
By repeating these loops in different ways, crocheters can create a wide variety of projects such as scarves, blankets, sweaters, hats, home décor, toys, and appliqués.
Unlike knitting, which usually keeps many stitches active on the needle at once, crochet typically works with one active loop at a time. This is one of the reasons many people find crochet easier to learn when they are first starting out.
Crochet may look complicated when you see finished pieces, but nearly every design is built from just a handful of basic crochet stitches. Once you learn these foundational stitches, you can combine them in different ways to create hundreds of textures and patterns.
That is why beginners do not need to learn everything all at once. Instead, the key is to start with the basic steps and stitches that form the building blocks of crochet.
In this guide, we will walk through the essential steps every crochet beginner should know to get started.
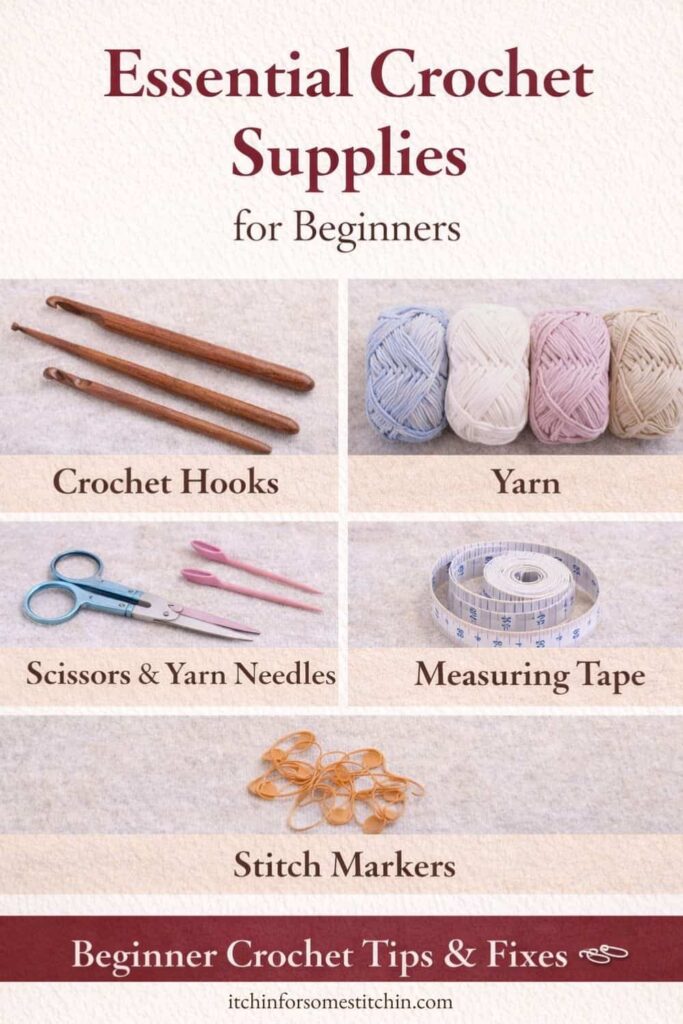
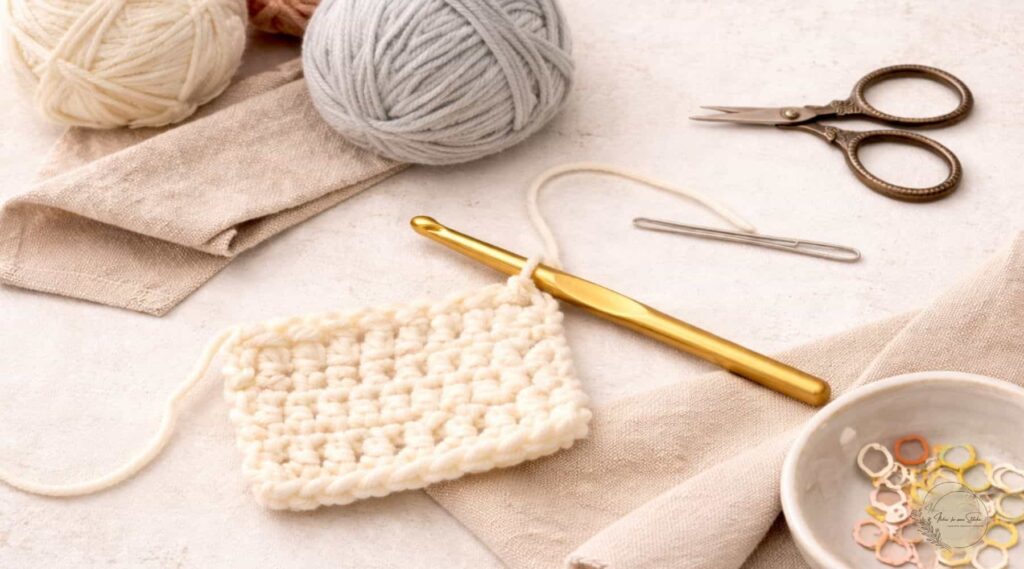
What You Need to Start Crocheting
One of the best things about crochet is that you do not need a lot of tools to get started. In fact, you can begin learning with just a few basic supplies.
Below are the four essentials every crochet beginner should have.
Yarn
First things first — you need yarn.
For beginners, I recommend starting with a smooth, medium-weight yarn in a light color. Light colors make it much easier to see your stitches, which is incredibly helpful when you are still learning where to place your hook.
Try to avoid very dark yarns, fuzzy yarns, or novelty yarns when you are first starting out. These can make it difficult to see your stitches and can quickly become frustrating for new crocheters.
A basic worsted-weight yarn is usually the easiest choice for beginners and works well for practice swatches and simple projects.
Crochet Hook
Next, you will need a crochet hook.
Crochet hooks come in many different sizes and materials, but for beginners, it is best to start with a medium-sized hook that feels comfortable in your hand.
Many beginners find hooks around 5.0 mm to 6.0 mm to be a good starting point when paired with worsted-weight yarn.
Crochet hooks can be made from aluminum, plastic, wood, or bamboo. The material you choose mostly comes down to personal preference, so feel free to experiment over time and see what feels best for you.
Scissors
You will also need a pair of scissors for cutting your yarn.
These do not need to be anything fancy. A small pair of craft scissors works perfectly well and is easy to keep with your crochet supplies.
You will use your scissors when finishing a project or whenever you need to cut yarn during a pattern.
Yarn Needle
Finally, you will want a yarn needle (sometimes called a tapestry needle).
This needle has a large eye so that yarn can easily pass through it. Yarn needles are used to weave in the loose ends of yarn when you finish a crochet project.
Taking the time to weave in your ends properly helps keep your work neat and prevents your project from unraveling.
Stitch Markers
Stitch markers are small tools that help you keep track of specific stitches in your work. They’re especially helpful when you’re learning because they can mark the first stitch of a row, the last stitch of a row, or an important stitch you don’t want to lose.
For beginners, stitch markers are often used to mark the first stitch of the row so you always know where your row begins and ends. This helps prevent one of the most common beginner mistakes — accidentally adding or losing stitches.
You don’t need anything fancy to start. You can use:
- store-bought stitch markers
- safety pins
- paper clips
- small pieces of yarn
As your skills grow, stitch markers become even more useful for shaping, increases, decreases, and keeping track of pattern repeats.
Measuring Tape
A flexible measuring tape is another helpful tool to keep nearby when crocheting.
You’ll use it to measure your work as you go so your project turns out the correct size. For example, you might measure:
- the length of a scarf
- the width of a dishcloth
- the size of a hat or headband
- the gauge of your stitches
Crochet patterns often tell you to crochet until your piece reaches a certain measurement. Having a measuring tape nearby makes it easy to check your progress and ensure your finished project fits or measures correctly.
Once you have these four simple tools — yarn, a crochet hook, scissors, and a yarn needle — you are ready to begin learning the basic steps of crochet.
In the next section, we will walk through the step-by-step process of how crochet works, starting with the very first step: making a slip knot.
A Few Beginner Tips Before You Start
Before we begin walking through the step-by-step crochet process, it can be helpful to know a few simple tips that make learning crochet much easier.
Things like choosing the right yarn, keeping your stitches loose, and learning how to recognize your stitches can make a big difference when you are first getting started.
If you would like a few extra beginner-friendly pointers, be sure to check out my guide:
Top 10 Tips for Absolute Crochet Beginners
In that post, I share some of the most common challenges new crocheters face along with practical tips that will help you avoid frustration as you learn.
Once you have those tips in mind, we can move on to the basic steps that form the foundation of crochet.
Essential Crochet Skills for Beginners
Before you begin practicing the crochet steps in this guide, it helps to become familiar with a few basic crochet techniques.
These skills form the foundation of nearly every crochet stitch and pattern. Learning them early will make it much easier to follow tutorials and crochet patterns as you continue practicing.
If you are new to crochet, the following guides will walk you through the core techniques beginners learn first.
How to Hold a Crochet Hook
Learning how to hold a crochet hook comfortably is one of the first things beginners should practice. There are a few different ways to hold the hook, and most crocheters eventually settle into the method that feels most natural for them.
If you are unsure where to start, this tutorial walks through the most common methods beginners use.
How to Hold Yarn When Crocheting
Controlling the yarn is what helps you maintain even stitches and consistent tension while crocheting.
At first this can feel a little awkward, but with practice your hands will develop a natural rhythm.
This guide shows a few beginner-friendly ways to hold yarn while crocheting.
How to Hold Yarn When Crocheting
How to Yarn Over in Crochet
The yarn over is one of the most common motions used in crochet stitches.
Almost every crochet stitch requires wrapping the yarn over the hook at some point, so learning this simple technique early will make the rest of crochet much easier.
Want a Guided Beginner Walk-Through?
If you would prefer to learn crochet through a structured series of lessons, you may enjoy my beginner course:
Crochet Fundamentals: Absolute Beginner Course
This course walks through the essential crochet skills step by step and is designed specifically for people who have never crocheted before.
Love Pinterest? I do!
Save this post for Later and follow all my boards.
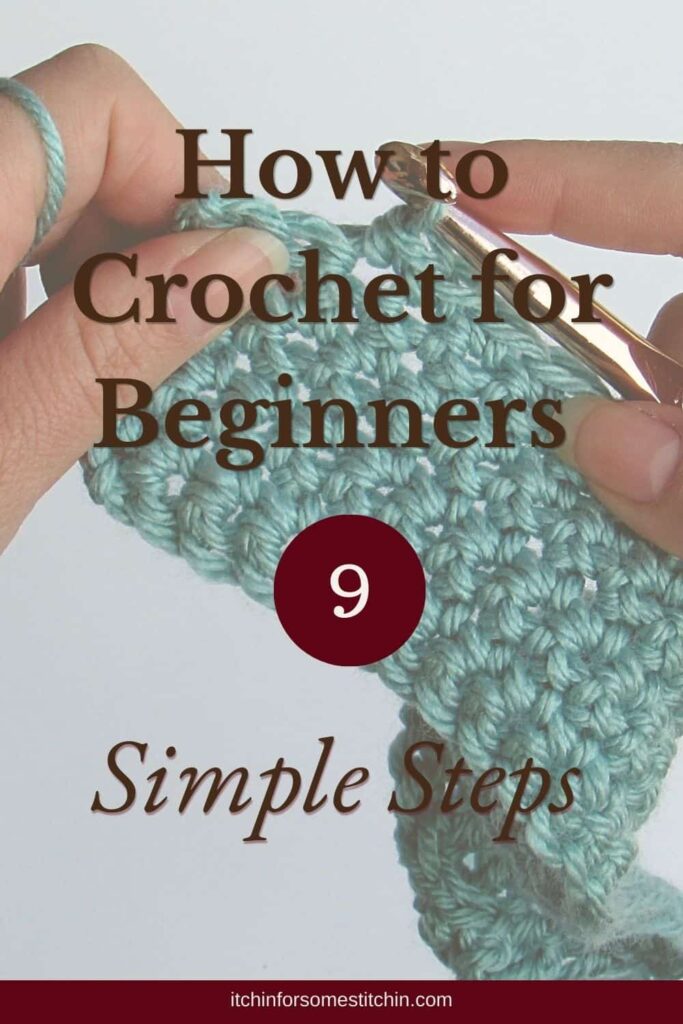
How to Crochet for Beginners Step by Step (9 Basic Crochet Steps)
Crochet may look complicated when you see finished projects, but the process itself is actually built from a simple sequence of steps.
Once you understand these steps, you can repeat them to create rows, shapes, and entire crochet projects. Every scarf, blanket, sweater, and crochet design begins with the same basic foundation.
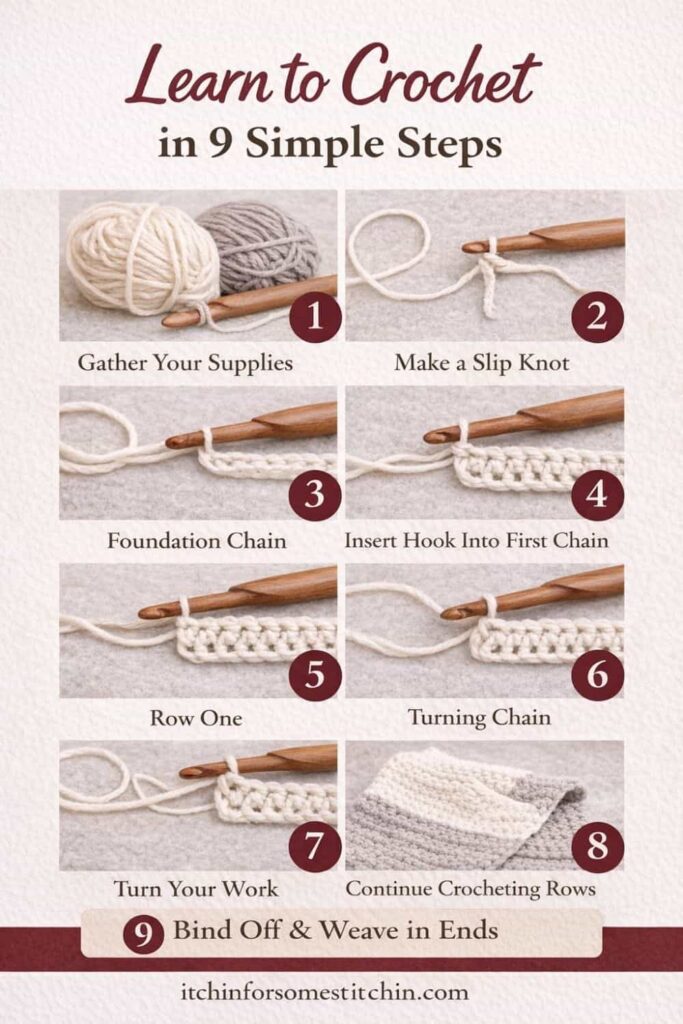
Below are the nine essential steps every crochet beginner should learn.
Tip: You can click the highlighted terms to view detailed tutorials for each step.
Quick Start Crochet Guide
If you would like a simple reference to keep nearby while you practice, I also created a Quick Start Crochet Guide that walks through these same basic steps in a compact format.
It is a helpful companion if you want a quick overview of the process without reading the full tutorial each time.
You can find that guide here:
Once you understand the overall process, let’s begin with the very first step — making a slip knot.
Step 1
Step 1: Make a Slip Knot
Every crochet project begins with a slip knot.
A slip knot is a simple adjustable knot that sits on your crochet hook and forms the starting point for your stitches.
Once the slip knot is on your hook, you are ready to begin creating your foundation chain.
If you have never made one before, you can follow my detailed tutorial here:
Step 2
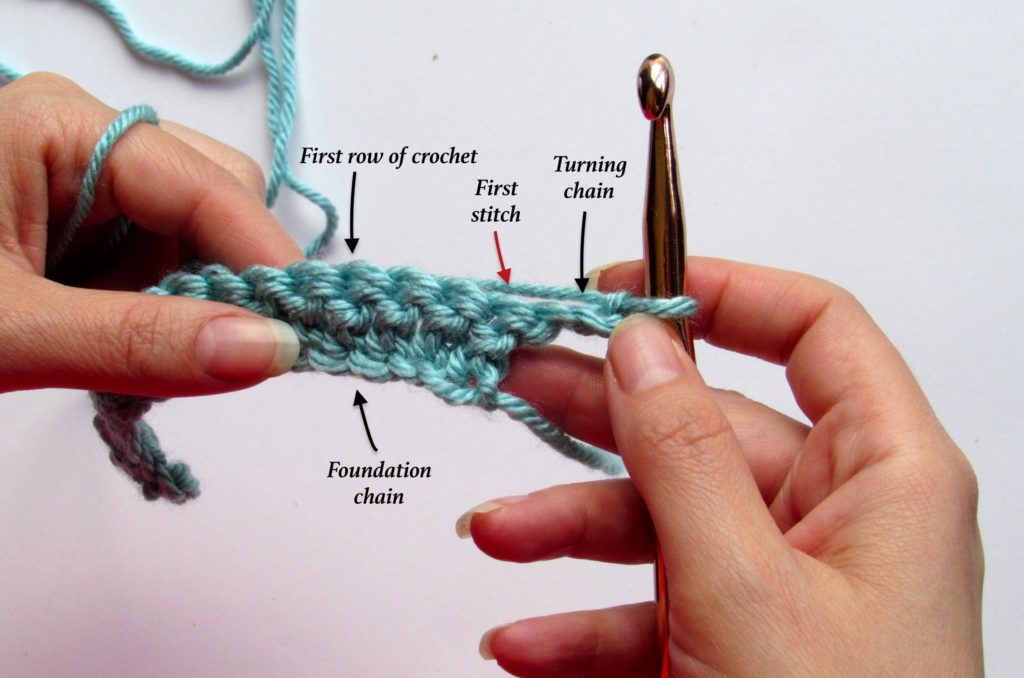
Step 2: Create a Foundation Chain
The next step is to make a foundation chain.
A foundation chain is simply a series of chain stitches that forms the base of your crochet project.
When beginners first start crocheting, their chains are often too tight. If this happens, try using a crochet hook that is one size larger than the hook recommended for your project. This will help keep your foundation chain loose and easier to work into.
Once your foundation chain is complete, you are ready to begin crocheting your first row of stitches.
Step 3
Step 3: Insert Your Hook Into the Chain
Once your foundation chain is complete, the next step is to insert your crochet hook into one of the chain stitches so you can begin working your first row.
Which chain you insert your hook into depends on the stitch you are making. For example, some stitches begin in the first chain from the hook, while others begin in the second or third chain.
Just as important is where you place your hook within the chain stitch itself.
There are several ways a crochet hook can be inserted into the foundation chain. The method you use will affect the appearance of your finished project.
Below are three common insertion methods.
Under Both Top Loops (Most Common)
The most common method is inserting your hook under the two top loops of the chain stitch. These two loops form a small “V” shape on top of the chain.
This is the method most beginners learn first and the one most patterns assume unless stated otherwise.

Under the Back Bump (Back Post of the Chain)
Another method is inserting the hook under the back bump of the chain stitch. When you flip the chain over, you will see a horizontal strand running along the back of the chain.
Working into this back bump can create a cleaner edge along the foundation row.
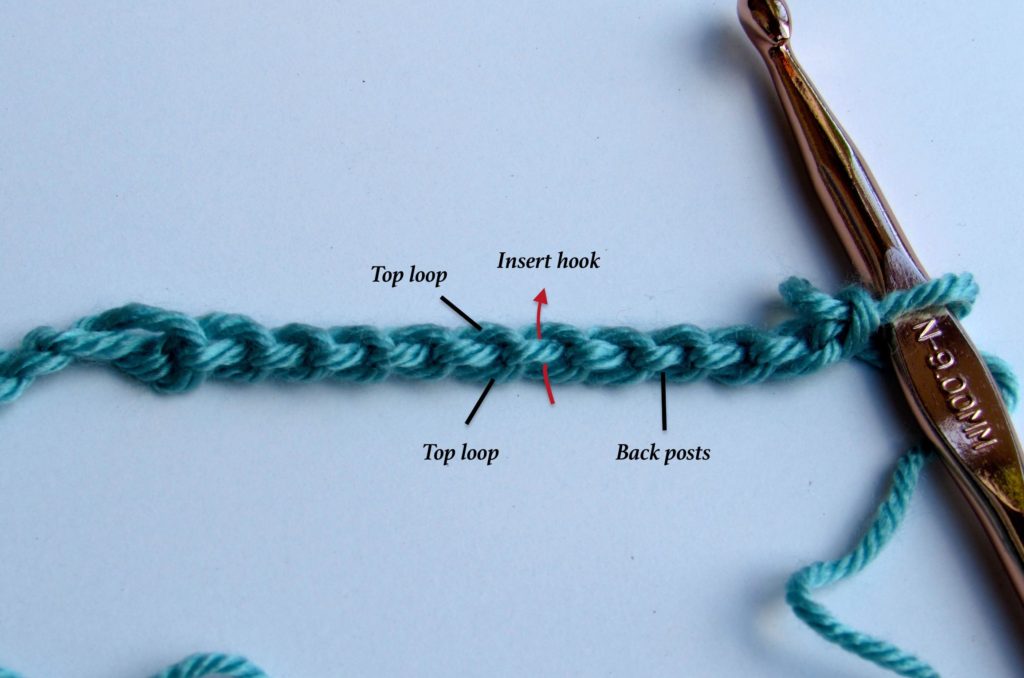
Under One Top Loop and the Back Bump
Some crocheters insert the hook under one of the top loops and the back bump at the same time. This technique provides extra stability and is sometimes used in specific stitch patterns.

f you are just getting started, I recommend using the under both top loops method, since this is the most common technique and the easiest for beginners to recognize.
Once your hook is inserted into the chain, you are ready to create your first crochet stitch, which we will cover in the next step.
Step 4
Step 4: Crochet the First Row
Once your hook is inserted into the correct chain stitch, you can begin working your first row of crochet stitches.
Follow the stitch instructions for your pattern, or practice using a basic stitch such as single crochet or double crochet.
Continue working one stitch into each chain across the foundation chain until you reach the end of the row.
Step 5
Step 5: Make a Turning Chain
When you reach the end of a row, you will usually make a turning chain.
A turning chain is simply a small number of chain stitches that lift your yarn to the height of the next row.
The number of chains you make depends on the stitch you are using. Taller stitches require more turning chains.
Step 6
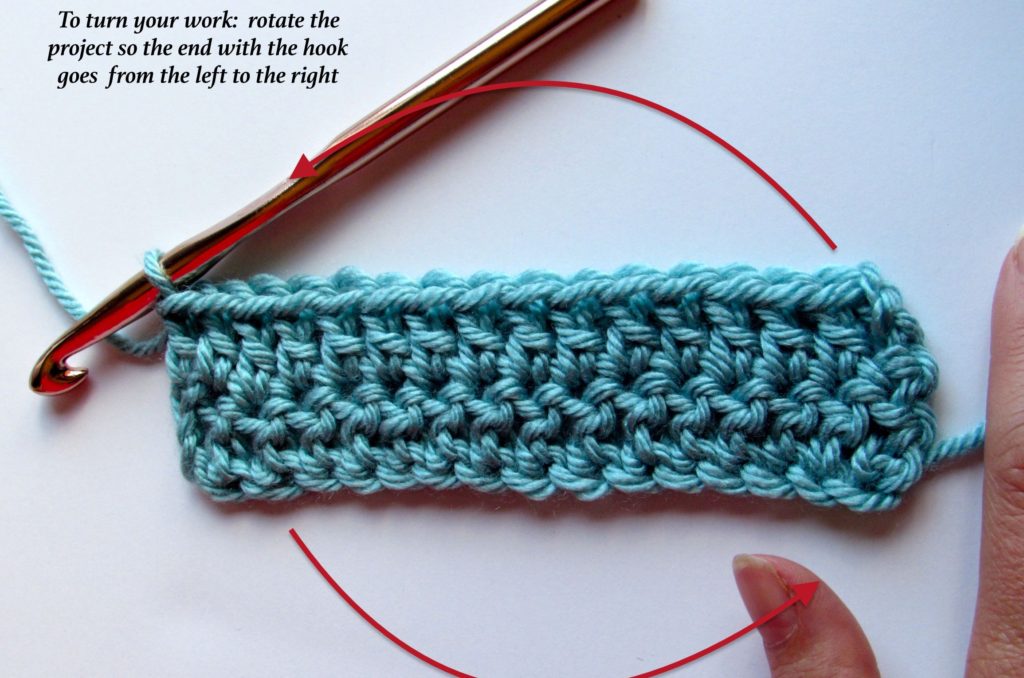
Step 6: Turn Your Work
Next, you will turn your work so you can begin crocheting the next row.
Turning your work simply means rotating your project so that the crochet hook moves from the right side to the left side (for right-handed crocheters).
After turning, you are ready to start working stitches into the new row.
Step 7
Step 7: Insert Your Hook Into the First Stitch
After turning your work, you will insert your hook into the first stitch of the new row.
To find the first stitch, look just past the turning chain. The first stitch is the stitch immediately following the turning chain.
Insert your hook into that stitch and begin working the next row.
Step 8
Step 8: Continue Crocheting Additional Rows
Repeat the same process for each new row:
- crochet across the row
- make the turning chain
- turn your work
- begin the next row
By repeating these steps, you can create fabric that grows longer with each row of stitches.
Step 9
Step 9: Fasten Off and Weave in the Ends
When your project reaches the desired size, the final step is to fasten off and weave in your yarn ends.
Fastening off secures your last stitch so your work does not unravel. After fastening off, use a yarn needle to weave the loose yarn tails into the stitches of your project.
Taking the time to weave in your ends properly will keep your finished piece neat and secure.
The Basic Crochet Stitches Every Beginner Should Learn
One of the things that surprises many new crocheters is that most crochet patterns are built from just a handful of basic stitches.
Once you learn these foundational stitches, you can combine them in different ways to create a wide variety of textures, patterns, and designs.
When you are first starting out, you do not need to learn dozens of stitches. Instead, focus on learning a few core stitches well. These stitches appear in many beginner projects and will help you build confidence as you practice.
Below are some of the most common crochet stitches beginners learn first.
Chain Stitch (ch)
The chain stitch is usually the very first stitch beginners learn.
It is used to create the foundation chain, which forms the base of many crochet projects. Chain stitches are also used for turning chains, spacing stitches, and creating decorative elements within patterns.
Because chain stitches appear in almost every crochet pattern, becoming comfortable with them early will make learning the rest of crochet much easier.
Single Crochet (sc)
The single crochet stitch creates a tight, dense fabric and is one of the most versatile stitches in crochet.
Many beginner projects use single crochet because it is easy to learn and produces a sturdy fabric that works well for items like dishcloths, bags, and small accessories.
Once you learn single crochet, you will already have the skills needed to complete many simple crochet patterns.
Half Double Crochet (hdc)
The half double crochet stitch is slightly taller than single crochet and creates a fabric that is a bit more flexible.
This stitch works up faster than single crochet and is commonly used in projects like scarves, hats, and blankets.
Because it sits between single crochet and double crochet in height, it is a useful stitch to know as you begin exploring different textures.
Double Crochet (dc)
The double crochet stitch is one of the most widely used stitches in crochet.
It creates taller stitches, which means projects made with double crochet often work up more quickly. This stitch is frequently used in blankets, shawls, garments, and many decorative stitch patterns.
Many popular crochet textures are simply different combinations of double crochet stitches.
Slip Stitch (sl st)
The slip stitch is the smallest crochet stitch.
It is commonly used to join rounds, move your yarn across stitches, or finish a project neatly. While it is not usually used to create rows of fabric by itself, it plays an important supporting role in many crochet patterns.
Treble Crochet (tr)
The treble crochet stitch (sometimes called triple crochet) is a taller stitch that creates a more open fabric.
Treble crochet stitches are worked by wrapping the yarn around the hook twice before inserting the hook into the stitch. Because of their height, treble crochet stitches are often used in lacy patterns, decorative stitches, and projects that require a lighter, more open texture.
While beginners usually start with single crochet, half double crochet, and double crochet, learning treble crochet is a natural next step as you continue building your crochet skills.
As you continue learning crochet, you will discover many other stitch variations and textures. However, mastering these basic stitches will give you a strong foundation for nearly every crochet project you try.
If you are ready to practice these stitches, the next step is to try a simple beginner project, which allows you to reinforce these skills while creating something useful.
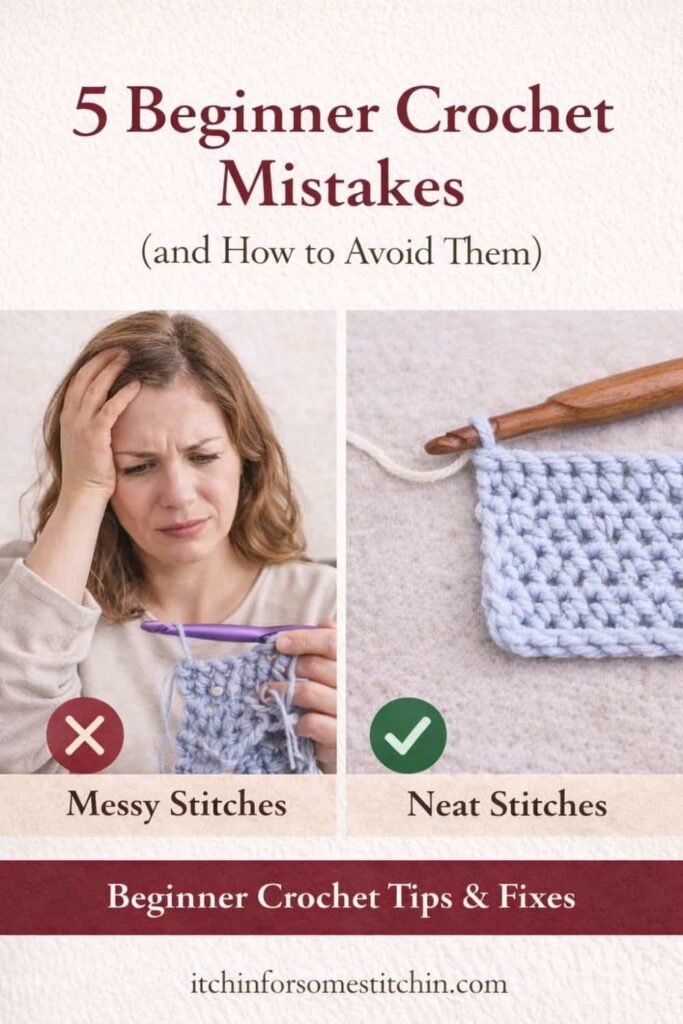
Common Crochet Mistakes Beginners Make
Learning to crochet takes a little practice, and it is completely normal to make mistakes along the way. In fact, most beginners struggle with the same few issues when they first start crocheting.
The good news is that once you recognize these common problems, they are usually very easy to fix.
Below are a few of the most common crochet mistakes beginners make and how you can avoid them.
Crocheting Too Tightly
One of the most common issues beginners run into is crocheting too tightly.
Tight stitches make it difficult to insert your hook into the next stitch, which can quickly turn crocheting into a frustrating experience.
If you notice that your stitches feel stiff or your hook is difficult to push through the loops, try loosening your grip on the yarn. Some beginners also find it helpful to use a slightly larger crochet hook while practicing.
With time and practice, your tension will become more natural and comfortable.
Losing or Adding Stitches
Another common mistake is losing stitches or accidentally adding extra stitches as you work across your rows.
This often happens when beginners skip the first stitch of a row or accidentally crochet twice into the same stitch.
A simple way to avoid this is to count your stitches at the end of each row. If the stitch count stays consistent, your project will maintain its correct shape.
Confusing the Turning Chain
The turning chain can be confusing when you are first learning to crochet.
Sometimes beginners accidentally crochet into the turning chain when they should skip it, or they miss the first real stitch after the turning chain.
This is something that becomes easier with practice. Taking a moment to carefully identify your first stitch before beginning a row can help prevent mistakes.
Using Difficult Yarn
Not all yarns are beginner-friendly.
Very dark yarn, fuzzy yarn, or novelty yarn can make it hard to see your stitches clearly. This can make learning crochet much more difficult than it needs to be.
When you are first learning, it is best to practice with smooth yarn in a light color so you can easily see where your stitches are.
Forgetting to Weave in the Ends
Finishing a project properly is just as important as crocheting it.
If the yarn ends are not woven in securely, your stitches can loosen over time and your project may begin to unravel.
Using a yarn needle to weave the ends through several stitches will help keep your finished piece neat and secure.
Mistakes are simply part of the learning process. Every experienced crocheter has gone through the same challenges when they were first starting out.
The key is to be patient with yourself and keep practicing. With time, your stitches will become more consistent and crocheting will begin to feel much more natural.
How to Read a Crochet Pattern
Once you feel comfortable with the basic crochet steps and stitches, the next skill to learn is how to read a crochet pattern.
Crochet patterns use simple abbreviations and instructions to explain how stitches are worked and how projects are constructed. At first these abbreviations can look confusing, but once you understand the format, patterns become much easier to follow.
If you are new to crochet patterns, this guide will walk you through the basics and explain the most common crochet abbreviations and instructions.
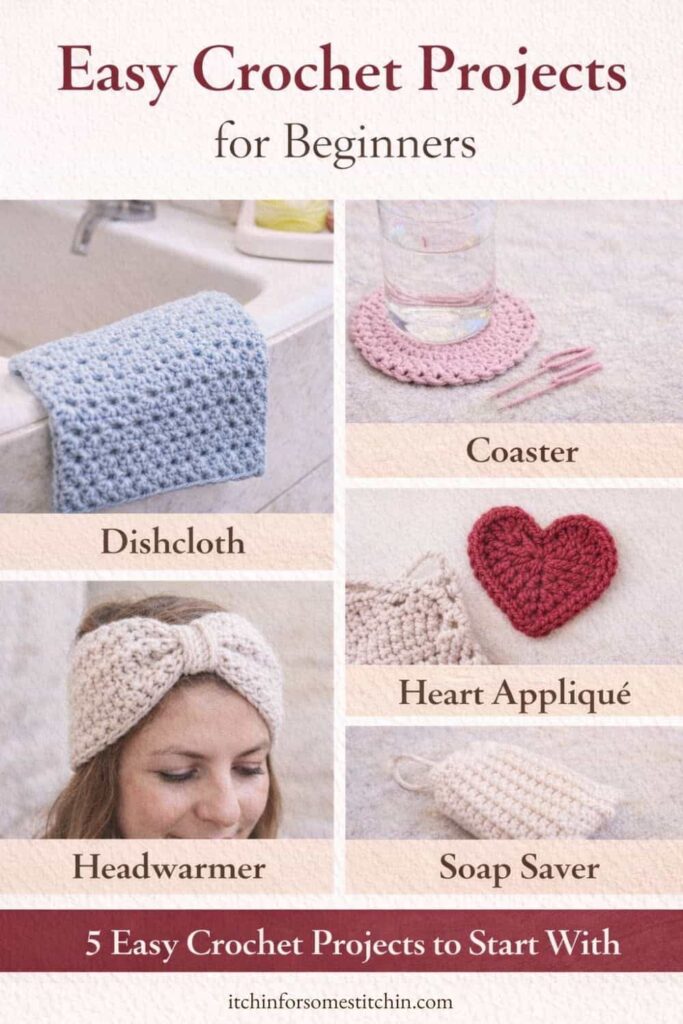
Easy Crochet Projects for Beginners
Once you understand the basic crochet steps and stitches, the best way to build confidence is to start with a simple beginner project.
Practicing on real projects helps reinforce what you have learned and allows you to see your skills improve with every stitch.
When choosing your first crochet project, look for patterns that use basic stitches and simple shapes. Projects worked in rows, such as squares or rectangles, are usually the easiest place to begin.
Below are a few beginner-friendly crochet projects that are perfect for practicing your new skills.
Dishcloths
Crochet dishcloths are one of the most popular beginner projects.
They are small, practical, and easy to complete in a short amount of time. Dishcloth patterns often use simple stitches like single crochet or half double crochet, which makes them a great way to practice maintaining even stitches and consistent tension.
Dishcloths also make wonderful handmade gifts.
Sunny Days Crunch Stitch Dishcloth
Coasters
Crochet coasters are another excellent beginner project.
They are quick to make and allow you to practice working with basic stitches while creating something useful for your home. Coasters are also a great way to experiment with different textures and stitch combinations.
Soap Savers
A crochet soap saver is a small pouch that holds a bar of soap and helps create a gentle lather.
Because these projects are compact and simple in shape, they are perfect for beginners who want to practice crocheting rows and working simple stitch patterns.
Appliqués and Small Motifs
Small crochet pieces such as hearts, flowers, and other appliqués are also wonderful beginner projects.
These small designs work up quickly and are a fun way to practice basic stitches while creating decorative elements that can be added to other projects like hats, bags, and blankets.
Sweet and Simple Chunky Bowtie Headwarmer
If you are ready to try your first wearable project, the Sweet and Simple Chunky Bowtie Headwarmer is a great beginner pattern.
This project uses basic stitches and simple construction, making it a perfect next step once you feel comfortable crocheting rows. It works up quickly with chunky yarn and is both stylish and practical for cooler weather.
Because it is fast to make and easy to customize, many beginners enjoy making several of these headwarmers as gifts.
Starting with simple projects allows you to focus on developing your crochet skills without feeling overwhelmed. As you become more comfortable with the basics, you can gradually move on to larger and more detailed patterns.
In the next section, we will answer a few common questions beginners often have when learning how to crochet.
Frequently Asked Questions – Beginner Crochet FAQ
If you are just starting out, you probably have a few questions about how crochet works and what to expect as you learn. Below are some common questions beginners often ask when learning to crochet.
Crochet is a skill that grows with practice and patience. By learning the foundational steps and stitches covered in this guide, you will be well on your way to creating your first crochet projects.
Next Steps in Your Crochet Journey
Each of these guides will help you continue developing the skills that form the foundation of crochet.


Thank you
I sincerely appreciate you visiting my blog! By sharing my content and/or making a purchase you are making it possible for me to continue producing and sharing free content for everyone to enjoy. Your support is amazing!
Sharon Trebes
Saturday 13th of February 2021
How do you determine the width (numbers to chain) for a afghan? I know that 11+2 = 13 chains. What I need to know is how many chains it will take. I would appreciate any help I can get. Thank you in advance.
Itchin4Stitchin
Saturday 13th of February 2021
Hi Sharon,
The answer is not quite as simple as you may think. A lot of it depends on your choice of yarn, your hook, your tension, your particular crocheting technique, and even the stitch you will be using. However, to make a "guesstamite" make your chain the width that your want your blanket to be. This is NOT exact. Sometimes when you make your first few rows your blanket will actually expand or it may shorten up. But... it is a good way to start and at least get some idea of the number of chains you will need. This is of course, only necessary to do if you are not following a pattern. If you are following the a pattern, it should tell you the number of chains.
I hope that helps!
Best wishes,
RaeLynn
Janie leos
Saturday 19th of September 2020
Easy to read and follow I’m self taught and I enjoy your helpful tips
Itchin4Stitchin
Sunday 20th of September 2020
Hi Janie,
Thank you so much! I am very glad to hear that! If you have any questions or need help learning crochet - feel free to reach out to me!
Sincerely,
RaeLynn
Janet White Tidwell, jwt
Thursday 9th of March 2017
Hello! I LOVE your Crochet site! I can't seem to find a Tutorial for some Basic Stitches: Triple Crochet Slip Stitch Half Double Crochet You have them listed as Basic Stitches but I can't find the Tutorials to tell me how to make them. Can you please direct me to the link to make them? I'd like to know what they are. Thank you so much for your WONDERFUL SITE!! Janet White Tidwell, jwt
Itchin4Stitchin
Thursday 9th of March 2017
Hi Janet,
Thanks so much for visiting my site! Okay, you got me, I'm busted! The reason you can't find the tutorials for these 3 techniques is because I haven't posted them yet. They are on my editorial calendar and will be posted soon. My intention was to add the links as soon as they were posted. This is a new blog so I am still learning the ropes. I probably shouldn't have published the Basic Steps for Beginners until these 3 were up, but hindsight is 20/20. My sincere apologies that these tutorials are not up when you need them. Please email me at [email protected] and I will help you with these 3 techniques. Thank you for your sweet compliments and I hope this little mess up on my part does not change your opinion!
Sincerely,
RaeLynn